
-
 Olympus OM-D For The Masses
Olympus combined features of their popular OM-D E-M5 and E-M1 cameras to create the new, affordable O-MD E-M10. -
 New Olympus Tough Has Flip-Up LCD
Olympus added a flip-up LCD display and super-wide 21mm zoom to their new TG-850 Tough waterproof camera to make it even better for outdoor adventure selfies! -
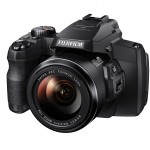
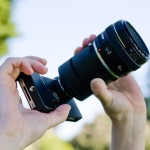
 Fujifilm's New X-T1 Pro DSLR-Style Camera
Fujifilm just announced a new weatherproof, DSLR-Style X-Series camera body to better appeal to working professional photographers. -
 Panasonic Lumix ZS40
Panasonic sets a new standard for pocket superzoom cameras - their new Lumix ZS40 has a 30x optical zoom lens, eye-level viewfinder, RAW shooting and built-in Wi-Fi. -
 Nikon D3300 With AA-Free Sensor
Nikon new entry-level DSLR, the D3300, features a 24-megapixel CMOS sensor with no anti-aliasing filter - just like the big boy cameras. -
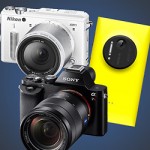
 Most Interesting Cameras of 2013
Photo-John's top ten most interesting and important cameras of 2013 - from camera phones to pro DSLRs. Is there something you missed last year?
-

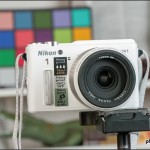
New Nikon 1 V3 Flagship Mirrorless Camera - Smaller, Faster & Now With Wi-Fi
Photo-John
Nikon has updated their Series 1 mirrorless line with the new 18.4-megapixel V3 flagship camera. It's smaller, it can shoot at up to 20 FPS, and it's the first Nikon 1 camera with built-in Wi-Fi. . Read More »
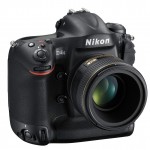
New Nikon D4S Flagship DSLR With ISO 409,600 Sensitivity
Photo-John
Step aside and make way for the new DSLR king – the Nikon D4S. Nikon tipped their hand about the new flagship camera a. Read More »
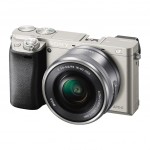
Sony Alpha A6000 Sets New Auto Focus Performance Standard
Photo-John
Sony claims their latest mirrorless camera, the 24-megapixel A6000, has the fastest auto focus of any APS-C sensor camera. Could it be the first mirrorless camera to outperform a DSLR? . Read More »
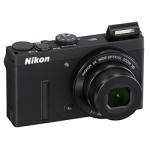
Nikon Adds Wi-Fi to Coolpix P340 Premium Pocket Camera
Photo-John
Nikon updates their high-end f/2.8 lens pocket camera by adding Wi-Fi so you can upload all your sweet food photos straight to Instagram!. Read More »

Rugged, Waterproof Nikon Coolpix AW120 Camera Adds Faster, f/2.8 Lens
Photo-John
Nikon just announced their third rugged, waterproof Coolpix AW point-and-shoot camera. Perfect for people who like to pl. Read More »
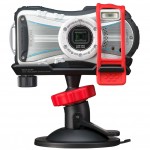
Ricoh WG-4 GPS Rugged Camera With New POV Mounting System & Manual Control
Photo-John
The Pentax WG rugged camera line is rebranded with the Ricoh name and gets a new mount system for POV shooting. . Read More »
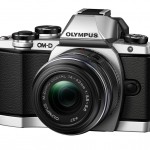
Olympus OM-D E-M10 - Smaller, Affordable OM-D
Photo-John
Olympus announces a new smaller, affordable OM-D mirrorless camera for well under US $1000. . Read More »
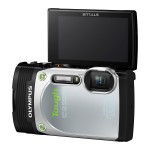
Olympus Stylus Tough TG-850 iHS Waterproof P&S Adds Flip-Up LCD & 21mm Wide-Angle Lens
Photo-John
Olympus’s latest Tough camera hits the sweet spot in terms of rugged waterproof point-and-shoot price and performance.. Read More »
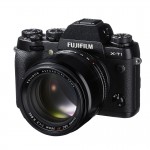
Fujifilm X-T1 Mirrorless Camera With Weatherproof Body & Large OLED Viewfinder
Photo-John
Fujifilm is taking their X-Series mirrorless line to the next level with a professionally-spec’d DSLR-style camera. Th. Read More »
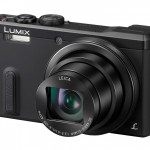
Panasonic Lumix ZS40 - 30x Pocket Superzoom With A Viewfinder and RAW Shooting
Photo-John
Panasonic takes the pocket superzoom to a new level with a 30x optical zoom lens, an electronic viewfinder, and RAW capability. . Read More »
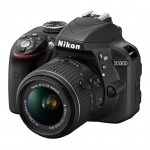
The Nikon D3300 Offers AA-Free Sensor In An Affordable Entry-Level DSLR
Photo-John
Smaller, lighter, sharper - Nikon's new D3300 digital SLR puts a 24-megapixel sensor with no anti-aliasing filter in an affordable entry-level DSLR. . Read More »
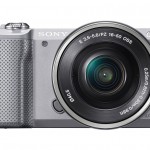
Sony Alpha A5000 - Compact Mirrorless Camera With Built-In Wi-Fi
Photo-John
Introducing Sony's latest entry-level mirrorless camera, the 20-megapixel APS-C sensor Alpha A5000, which Sony says is the "World’s Lightest Interchangeable Lens Camera with Wi-Fi.". Read More »
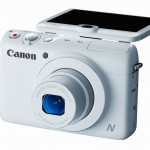
Canon PowerShot N100 Adds Rear-Facing Camera & Enhanced Wi-Fi
Photo-John
New Canon PowerShot N100 updates Wi-Fi features, adds wider f/1.8 zoom lens, and offers new Dual Capture mode with second rear-facing camera. . Read More »
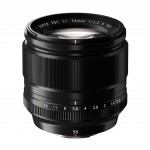
New Fujifilm 56mm f/1.2 Portrait Lens For X-Series Cameras
Photo-John
Fujifilm has a new a new fast-aperture portrait lens for X-Series mirrorless camera owners, the XF 56mm f/1.2 R prime. . Read More »
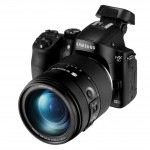
Fujifilm FinePix S1 50x Superzoom - World's First Weather-Resistant Bridge Camera
Photo-John
Fujifilm just announced the world's first weather-resistant superzoom camera, the 16-megapixel FinePix S1. It has a 50x 24-1200mm (equivalent) zoom lens, full HD video and built-in Wi-Fi for easy photo and video sharing. . Read More »
New Fujifilm Wi-Fi Instax Printer Makes Instant Prints From Smart Phone Photos
Photo-John
Use your Smart Phone to make fun, credit card-sized prints with the new Fujifilm Instax portable instant printer. . Read More »
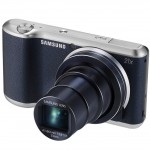
Samsung Galaxy Camera 2 - Android-Powered Superzoom
Photo-John
The second generation of Android-powered Samsung Galaxy Camera is here - this time without the 4G mobile capabilities. . Read More »
Samsung NX30 With Expanded Wi-Fi Features & Tilting EVF
Photo-John
We should all pay more attention to the Samsung NX mirrorless cameras. Check out their new NX30 camera and 16-50mm f/2-2.8 zoom lens to find out why. . Read More »
Top Ten Most Interesting & Important Cameras of 2013
Photo-John
There were some and interesting new cameras this year. Check out Photo-John's picks for the most interesting and important cameras of 2013. Happy New Years! . Read More »

Video: Custom SLR's Tripod Christmas Tree
Photo-John
Merry Christmas, photo nerds! Here's a fun time lapse video of the Custom SLR crew building a Christmas tree out of tripods. . Read More »
Nikon 1 AW1 Studio Sample Photos
Photo-John
Is the world's only waterproof, interchangeable lens digital camera any better than a rugged point-and-shoot? Check out our Nikon 1 AW1 studio tests to find out. . Read More »
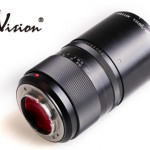
"Fastest Lens In the World" - The Handevision Ibelux 40mm f/0.85
Photo-John
Almost a stop faster than Leica's f/1.0 Noctilux, the new Handevision Ibelux 40mm f/0.85 mirrorless lens claims the spot of world's fastest production lens. . Read More »

2013 Holiday Gift Guide - Affordable Gifts For Photographers
Photo-John
Looking for affordable, last minute gifts for the photographer in your life? We've got your back. Here are ten great gift ideas for photographers, starting at just $10. . Read More »

New Fujifilm 10-24mm f/4 OIS Wide-Angle Zoom Lens
Photo-John
Fujifilm announces the 11th lens for their X-Series mirrorless cameras - a 10-24mm f/4 OIS super-wide zoom. . Read More »

Redrock & Monochrome - Featured Member Photos - December 17th, 2013
Photo-John
Southern Utah redrock cliffs and monochrome are the unintentional themes in this round of Featured Member Photos by ksbryan0, EOSThree, Old Timer and photogkellyrae. . Read More »
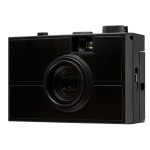
Last Camera - DIY Plastic 35mm Film Kit Camera
Photo-John
Toy camera fans, film shooters and DIY nerds - you're gonna love the Last Camera plastic 35mm camera kit!. Read More »

Adobe Lightroom 5.3 Software Update
Photo-John
Adobe Lightroom 5.3 software update is available. Visit our Lightroom 5.3 announcement page to learn more and to download the update. . Read More »

Digital Cameras With Built-In Wi-Fi - A Video Demo
Photo-John
If you've been wondering how exactly the "built-in Wi-Fi" in digital cameras works, and what it actually does, this demo video will tell you everything you need to know. . Read More »
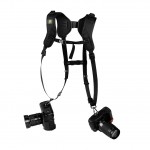
BlackRapid RS DR-1 Double Camera Strap - Featured User Review
Photo-John
Event photographers - need to carry and use two DSLRs at the same time? Check out this Featured User Review for the BlackRapid DR-1 dual camera strap system. . Read More »

Nikon 1 AW1 Underwater Dive Test Video
Photo-John
We took Nikon's new AW1 waterproof mirrorless camera diving to test its underwater capabilities. Check out the video we made to find out if it survived. . Read More »
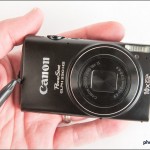
Canon PowerShot ELPH 330 HS Quick Review
Photo-John
We keep recommending the Canon PowerShot ELPH 330 HS Wi-Fi pocket superzoom, and putting it in our buyer's guides. So we figured we'd better write a review to explain why we think it's such a great little camera. . Read More »
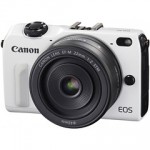
Canon EOS M2 Mirrorless Camera Announced In Japan
Photo-John
A new Canon mirrorless camera was announced this week in Japan. The Canon EOS M2 has an improved auto focus system, built-in Wi-Fi and a slightly smaller body. . Read More »

Helping Hands, Basketball & A Stork - Featured Member Photos - December 4, 2013
Photo-John
New Featured Member Photos are posted! Check out SmartWombat's "Helping Hands" photos, some African wildlife from DennisT, basketball action by dhyravy, and a great sunset photo from armando_m. . Read More »
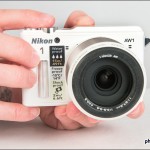
Just In: Nikon 1 AW1 Waterproof Mirrorless Camera
Photo-John
Could the Nikon AW1 be the ultimate outdoor action sports camera? Check out our hands-on preview of Nikon's new waterproof, interchangeable lens camera. . Read More »

2013 Holiday Point-and-Shoot Camera Guide
Photo-John
Our Holiday point-and-shoot guide has ten great cameras starting from just $150. There's a camera here for everyone - outdoorsmen, serious photographers, travelers and casual point-and-shooters. . Read More »
The iPhone SLR Mount - Don't Buy It
Photo-John
The iPhone SLR Mount let's you attach Nikon or Canon SLR lenses to your iPhone. Is this a good idea or a bad idea? Read the article and let us know what you think. . Read More »

2013 Holiday Mirrorless Camera Guide
Photo-John
Our Holiday mirrorless camera guide is complete! Check it out to find out about some of the coolest and best interchangeable lens mirrorless cameras for this Holiday season. . Read More »

2013 Holiday DSLR Camera Guide
Photo-John
Everyone loves digital SLRs and our Holiday DSLR guide features a few of the best, with options for every level of photographer and every kind of budget. . Read More »

Fujifilm X100S Review
Photo-John
Photo-John's full review of the Fujifilm X100S is complete. Read the review to find out why this fixed lens rangefinder-style camera is so popular. . Read More »
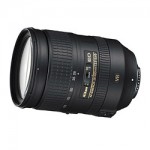
Nikon AF-S 28-300mm f/3.5-5.6 VR Zoom Lens - Featured User Review
Photo-John
Nikon's AF-S 28-300mm VR zoom lens is a great all-purpose / travel zoom for full-frame DSLR owners. Check out this review by footloose-photography to learn more about it. . Read More »

Winter Skatepark Goats - Featured Member Photos - November 18, 2013
Photo-John
Our mid-November Featured Member Photo picks are up! There's nighttime skate park action, a couple of landscapes, and a critter photo from New Zealand. Check them out and post some of your own photos!. Read More »
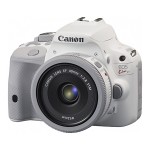
Canon Japan Unveils the White Kiss DSLR - An All-White EOS Rebel SL1 / 100D
Photo-John
The recently teased Canon DSLR has been revealed - it's an all-white version of the EOS Rebel SL1 / 100D digital SLR that was introduced this spring. . Read More »

Custom SLR Air Strap Camera Strap Kickstarter Campaign
Photo-John
Kickstarter veterans Custom SLR are launching a new high-tech camera strap that's lighter and more comfortable than the camera strap that came with your DSLR. . Read More »
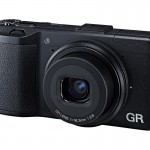
The Ricoh GR - A Serious Pocket Camera With f/2.8 Prime Lens & DSLR Sensor
Photo-John
With an f/2.8 prime lens, RAW manual shooting and a big APS-C sensor with no anti-aliasing filter, the Ricoh GR is a hell of a pocket camera. . Read More »
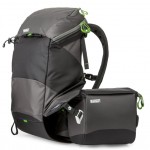
MindShift Gear rotation180° Panorama Camera Backpack With Rotating Beltpack For Easiest Ever Access
Photo-John
Outdoor photographers and anyone else who wants camera access without having to take off their pack need to check out MindShift Gear's new rotation180° camera pack.. Read More »
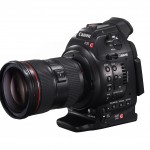
Canon Adds Continuous Auto Focus To EOS C100 Digital Video Camera For $500
Photo-John
Canon is offering a Dual Pixel AF upgrade for EOS C100 Digital Video camera owners. The upgrade adds continuous auto focus to the DSLR-based, pro-level video camera. . Read More »

Adobe Lightroom 5.3 & Camera Raw 8.3 Release Candidate Software Available
Photo-John
New Release Candidate software is available for Adobe Lightroom and Camera Raw. The updates include RAW support for the Nikon D610, Olympus OM-D E-M1, Sony's new full-frame mirrorless cameras, and the Fujifilmfilm X-E2. . Read More »

Canon Teasing New DSLR Body
Photo-John
Is a new Canon professional digital SLR on the near horizon? A new Canon teaser Web site points in that direction. . Read More »
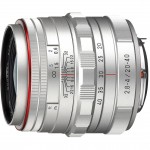
New Pentax DA 20-40mm F2.8-4 - First Limited, Weatherproof Zoom Lens
Photo-John
New 20-40mm f/2.8-40mm lens is the first zoom and the first weatherproof lens in Pentax's premium "Limited" DSLR lens line. . Read More »
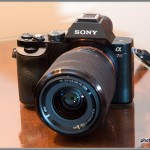
Hands-On With Sony's 36-Megapixel Alpha A7R Full-Frame Mirrorless Camera
Photo-John
Check out our hands-on preview with Sony's new ground-breaking 36-megapixel full-frame A7R mirrorless camera - complete with a big gallery of sample photos!. Read More »