
Adobe fully unveiled Photoshop Creative Suite 4 today after a series of peeks into its industry standard image manipulation application. Updates to Photoshop are always approached with a combination of excited anticipation and woe, especially an upgrade that has promised big changes to the user interface. PhotographyReview.com has been using beta versions of Photoshop CS4 and Bridge CS4 for several weeks now and is here to answer those important questions: What are the cool features? Will it cause you heartache? How does it line up with Lightroom 2.0? Read on to find out.
Photoshop: New UI, Adjustments Panel, Masks Panel
Photoshop CS4 does not introduce a ton of new features for photographers. When a program is already the kitchen sink of image processing, it doesn’t need to. The success of Adobe’s Lightroom product, which was largely a repackaging of existing features into a new workflow application, demonstrates that the greater challenge that Photoshop faces is making sure that its wealth of functionality remains accessible to the many audiences it addresses. Photoshop CS4 does come with many new features for manipulating 3D objects, but part of the challenge is making sure that these new features don’t squeeze out screen real estate for the features that photographers use.
The engineers at Adobe are perfectionists when it comes to their user interfaces. Photoshop has a long history of revamps as they try to enable access to more functionality from within the same space and also maintain cohesion between their products — long-time Photoshop users still remember the pain of keyboard shortcuts and tools being rearranged. The challenge for CS4 was producing a revamp that would be greeted warmly like Lightroom, instead of with a mixture of cheers and derision like the Microsoft Office ribbon. Photoshop Principal Product Manager John Nack even launched a
pre-emptive strike on his blog in an attempt to quell potential unrest. With all this hubbub, you might expect something very dramatic, but the end result is quite familiar — I even used Photoshop CS3 tutorials with CS4 and had little problem adjusting. Much of the groundwork was already laid when Photoshop CS3 introduced the Dock, a pane on the right-hand side that wrangles Photoshop’s free-floating windows into a single, collapsible space. The rest feels right at home for Lightroom users.
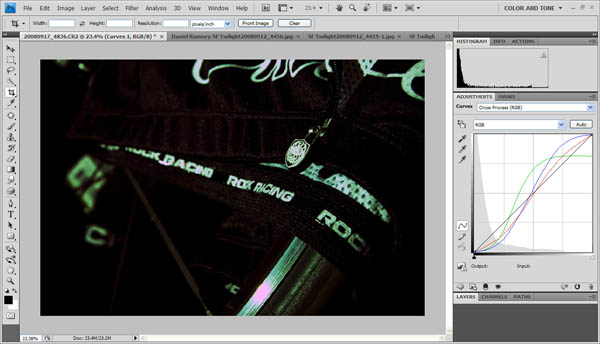
CS4: Adjustments Panel
In CS3, the Dock killed palettes and replaced them with panels. In CS4, the Dock continues its voracious appetite for free-floating windows, transforming adjustment and layer mask windows into panels. The new Adjustments Panel and Masks Panel significantly change the photography workflow. The ability to tweak curves, levels, and other settings from the right-hand Dock panel should feel familiar to Lightroom users and has many benefits within Photoshop, including staying out of the way of your photo and letting you simultaneously manipulate the image with other tools. I’ve been using non-destructive Adjustment Layers more frequently in my workflow to adjust levels, exposure, and contrast, and I’ve appreciated the greater attention to this feature. I’ve even found myself using adjustment presets more often due to their greater prominence in CS4.
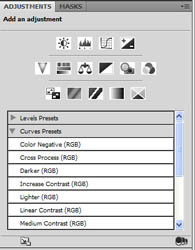 CS4: Adjustment Presets |
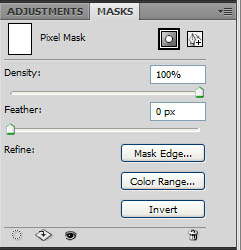 CS4: Masks Panel |
The Mask Panel provides much quicker access to tools for adjusting and creating masks. There is one-button access to load selections from a mask, refine the mask edge, or adjust the color range. You can also apply, enable, disable, or invert a mask as well as adjust the density and feathering with sliders. I enjoyed the quick access to feathering and refining the mask edges. I still haven’t figured out an easy way to use the CS3 Refine Edge tool to do the same.
Another big upgrade to the user interface is the ability to easily tile your photos in N-up displays (e.g. 2-up, 3-up) via an application frame. Laptop users may only be able to fit two images side by side, but owners of 30″ monitors will appreciate the various 5-up and 6-up layouts. In addition to the dock upgrades, workspaces have a bigger billing like Lightroom’s workspaces (Develop, Library, etc…). There are similar changes to Bridge CS4 as Adobe seeks greater user interface consistency with this release. The net result is a Lightroom-ification of the Photoshop interface, which should be greeted with cheers by photographers.
There are plenty of small tweaks to appreciate as well. Spring-loaded shortcuts allow you to hold down a key to switch to a tool, use it, and then release to go back to your previous tool — i.e. exactly how the space bar works with the hand tool. The Histogram panel also gets a much needed upgrade to 6-colors, and the Dock panels can toggle between expanded and standard views to use more or less space.
Photoshop: New Features, Content-Aware Scale, aka “Seam Carving”
Depending on your needs, Photoshop CS4 can seem either long or short on the new features list. The dodge, burn, and saturation tools preserve detail better and there are several enhancements to blending different takes of photos and aligning layers. Some Windows users will appreciate the 64-bit edition; Mac users will have to wait until CS5. There are also quite a lot of new features if you’re into 3D and using the Extended edition. The ability to open 3D objects made itself into extended versions of CS3 and has grown into a full suite of tools for manipulating 3D objects and even creating 3D objects from 2D images. For photographers, though, the big feature has to be Content-Aware Scaling.
For those of you who remember the target=”_blank”>”wow” video of “Seam Carving” that hit the Internet a little over a year ago, be ready for the same wow factor in Photoshop. Traditional resizing stretches or pinches an image, which is not very useful for photography — you don’t want people to end up extra skinny or fat. Seam Carving instead removes pixels along the least important “seam” in an image. In general, background details like sky and ground are collapsed in favor of your subject, like a person. It is a powerful tool for preserving important details in a photo while being able to meet different aspect ratio requirements.
 Seam Carving Example 1: Before |
 Seam Carving Example 1: After |
 Seam Carving Example 2: Before |
 Seam Carving Example 2: After |
Here are two examples of this technique in action. In both photos, the left side of the image was pulled in to make the photo smaller — the Content-Aware Scaling did the rest. In example 1, the algorithm distorted the street lines but left the cyclist preserved. In example 2, the distortion pinched the faces in the background but preserved the foreground.
You will need a lot of computer horsepower to use this feature, though Adobe may improve the performance before final release. My laptop is at the low end (1Ghz, 1GB RAM) of what is permissible to run CS4 and Content-Aware Scaling is very slow on it.
Bridge: Faster, Review Mode, new UI, and More
Bridge CS4: Essentials Mode
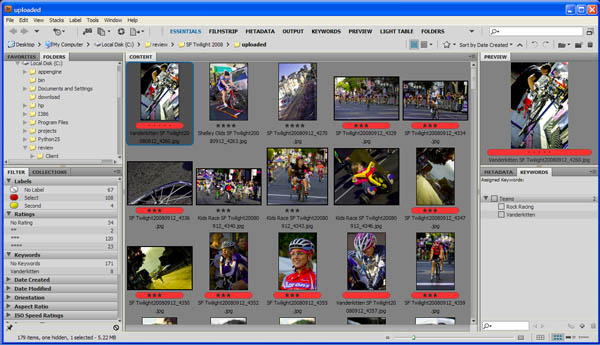
Adobe Bridge grew up a lot in this release. Adobe Bridge in CS3 was not much more than a fancy, RAW-enabled file explorer for Photoshop. Adobe Bridge in CS4 has completely supplanted my use of Photoshop.
Bridge CS4 caters much more to the photography audience. The space bar quickly brings up a full-screen preview and Ctrl-B lets you enter Review Mode with your currently selected photos. Review Mode offers a huge workflow improvement. The photos you’ve selected appear as a full-screen carousel that rotates using the left and right arrows. You can reject images using the down arrow and use the normal shortcuts to add ratings and tags. Once your selection is whittled down to four photos or less they are shown side-by-side. When you exit Review Mode you can create a new collection. There are also Smart Collections, which let you create virtual collections based on various metadata. None of these features should be a surprise to Lightroom or Aperture users, but Bridge comes with Photoshop.
Like Photoshop, Bridge CS4 is now fully onboard with workspaces. The confusing “1″, “2″, “3″ buttons (default mode, light table mode, and horizontal filmstrip mode) in Bridge CS3 have been replaced with workspace buttons on the top application bar labeled Essentials, Filmstrip, Metadata, Output, Keywords, Preview, Light Table, and Folders. You can also create your own workspaces and hide the ones you don’t want to see. The new Output workspace has the most new features: it lets you export your photos to PDF or Web galleries, with handy settings for automatically uploading photos to your Web site. You can even output using the attractive Lightroom Flash Gallery template, which has become my default for sending galleries to clients.
Adobe Bridge CS4 is faster and less buggy than CS3. Startup is about twice as fast, though Bridge still slows down with prolonged use and eats up 250MB of memory or more. Downloading photos from your camera and creating RAW thumbnails is also much more solid. In my experience, Bridge CS3 would often stop processing new RAW images and I would have to restart it, if it didn’t crash first. Both of these problems are gone with the new version.
Camera Raw: Gradients, Adjustment Brushes, and More
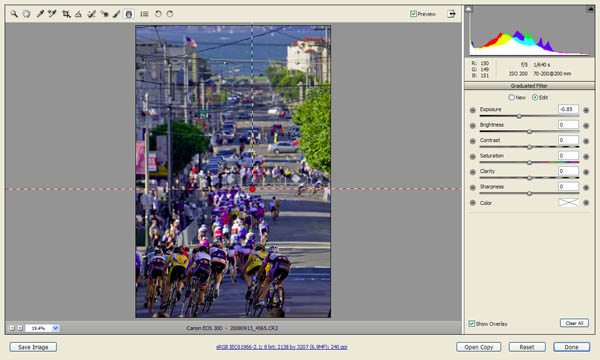
Adobe Camera Raw: Using gradients as a burn tool
Adobe Camera Raw 5.0 offers several new features that bring it on par with the non-destructive editing capabilities of Lightroom 2.0. The user interface is mostly unchanged, but there are several important new buttons and panels packed in.
Gradients are an essential new editing tool. You can approximate a variety of photo filters in a more precise manner from warming filters to graduated density filters and more. Exposure, brightness, contrast, saturation, clarity, sharpness and color can all be manipulated. I frequently use the exposure or color tool to bring blue back into the sky. I also use it as a general purpose dodge and burn tool to shape the lighting in the image.
More precise control is available with adjustment brushes. The brushes perform the same manipulations as the gradients, but you can paint them directly onto portions of the image. You can automatically mask brush strokes to confine the adjustments — this is very useful when you’re lightening someone’s face and don’t want the adjustment to bleed over into other parts of the photo.
The CS4 update also fixes some notable annoyances. You can now apply vignetting post-crop, and the crop-and-straighten tool now rotates the image to the correct orientation. My only complaint for the new Camera Raw is that it is still a separate plug-in rather than a part of Bridge or Photoshop. You have to open it like a separate application each time you want to process photos. This may be intentional: if the features of Camera Raw were built into Adobe Bridge I probably wouldn’t be saving up money for Lightroom 2.0.
Worth the Upgrade?
Photoshop is a big and expensive enough product that it’s hard to answer this question. It’s a product that you have to have, but whether or not a particular upgrade is worthwhile depends on what parts of the product you find most useful. This review is also only based on a beta version, and the final product has yet to be judged. Seam Carving is an amazing feature with plenty of appeal, but be prepared to have plenty of CPU power to back it up. A bigger upgrade in Photoshop CS4 for me was noticing features of that are in Photoshop CS3. I’d rush to write a new discovery in my review notebook only to realize that the feature was already there, but buried behind some tiny icon.
The other major benefit for my photography use was the one-two punch of both Bridge and Photoshop. In CS3, I rarely used Bridge and frequently used Photoshop. In CS4, I frequently use Bridge and rarely use Photoshop, largely due to the improvements in Adobe Camera Raw. In particular gradients and adjustment brushes have replace equivalent dodge, burn, and sponge adjustments in Photoshop. Bridge is also much nicer place to live in as well and I find I am using RAW more frequently as a result.
Photoshop and Bridge CS4 are not Lightroom killers — Adobe wouldn’t be a very good company if they were. However, I’m sometimes asked for recommendations from friends as to whether they should buy Lightroom or Photoshop for their photography. The traditionalist in me would want to say, “You have to own Photoshop,” but the truth was Lightroom (or Aperture) was a far superior product 95% of the time. The best answer usually was to buy Lightroom first and then save up for Photoshop second. Now, I might actually reverse that. Most of my work is sports photography that could entirely be handled with Lightroom, but I’ve also been doing some studio work that really needs Photoshop for its advanced retouching capabilities. While I really want to get Lightroom one of these days, I’ve been quite happy living with CS4, much more than I was with CS3. I will definitely save time once I get Lightroom, but at least now I can afford to wait.
Your story says Lightroom came out of Macromedia Labs. This is not correct, although the myth seems to have spread from the Lightroom betas being hosted by the Macromedia Labs servers. But that was only Adobe taking advantage of a public beta distribution system they had just acquired.
The link below is their story about Lightroom, it came from Adobe the whole time
http://photoshopnews.com/2006/01/09/the-shadowlandlightroom-development-story/
@Beck: my mistake and thanks for the correction. I’ve updated the story.
If you want to check out CS4 before buying, they just put up the trial downloads this week…
The fully-functional 30-day free tryouts are available at:
http://www.AdobeTrials.com
Pretty sure that last post is spam.
Great bit of information there. Thanks.